Set Up Forms in a Genie App
CloudMySite Forms lets visitors send information from your Genie app to you. You can use it for contact messages, quote requests, bookings, support requests, feedback, newsletter interest, applications, and other simple website forms.
This guide is written for nontechnical users. You do not need to know code, APIs, or hosting settings to follow it.
What You Are Setting Up
There are two parts to a working form:
- The form people see in your app: for example, the Contact page with fields like name, email, phone, and message.
- The CloudMySite form behind it: this stores submissions, sends email notifications, and gives you settings such as spam protection.
When you connect them, visitors can fill out the form in your app and the submission will be saved in CloudMySite Forms.
When to Use This Guide
Use this guide when:
- Genie created a contact page or form in your app and you want it to work.
- You added a form with a prompt and now need to connect it.
- You created a CloudMySite Form plan and want to use it inside a Genie app.
- You want to view form messages from the Genie app dashboard.
- You want to update the email address, spam protection, redirect page, or other form settings.
Before You Begin
It helps to have:
- A CloudMySite account.
- A Genie app or website open in the builder.
- An active CloudMySite Form plan.
- A form created under that plan.
- The email address where you want to receive submissions.
If you do not have a Form plan yet, start from Forms in your CloudMySite dashboard and choose a plan. The Free plan is a good first option for a simple contact form.
Simple Setup Flow
For most Genie apps, the flow is:
- Create or activate a CloudMySite Form.
- Open your Genie app.
- Go to Admin.

- Open Forms.
- Choose the CloudMySite form you want to use.
- Select Connect to app form.
- Choose the form in your app.
- Confirm the connection.
- Test the form in preview.
- Publish when everything looks good.
Step 1: Create or Choose a CloudMySite Form
First, make sure you have a CloudMySite form ready.
- Sign in to CloudMySite.
- Open Forms from your dashboard.
- Choose your active Form plan.
- If you have not created a form yet, select Configure Form.
- Enter a clear Form Name.
- Enter the Recipient Email where messages should go.
- Save the form.
Good form names include:
- Contact Form
- Quote Request
- Booking Request
- Support Form
- Career Application
- Newsletter Signup
Use a name that tells you where the form is used. This is helpful later if your app has more than one form.
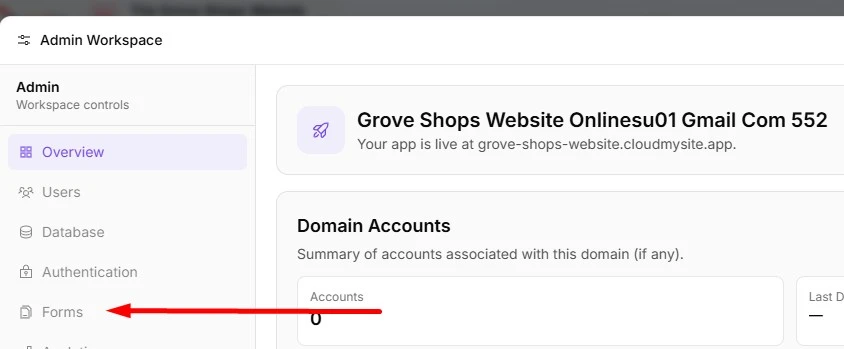
Step 2: Open Forms Admin in Your Genie App
After the CloudMySite form exists, open your Genie app.
- Open your app in the Genie builder.
- Open Admin.
- Select Forms.
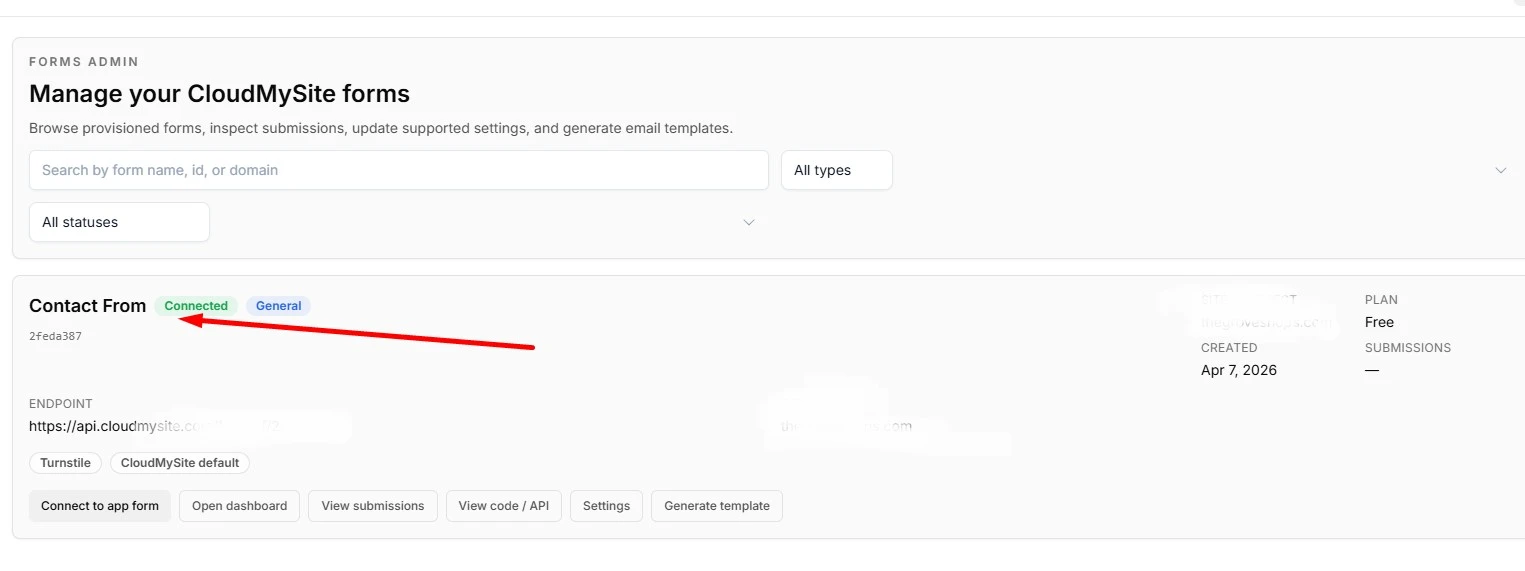
The Forms Admin area shows the CloudMySite forms available to your account or form plan.
You may see details such as:
- form name
- form ID
- connection status
- recent submissions
- settings
- email template options
- code and endpoint details
For normal Genie setup, you usually only need Connect to app form, Submissions, and Settings.
Step 3: Connect a CloudMySite Form to a Form in Your App
If your app already has a visible form, such as a Contact page form:
- In Admin > Forms, choose the CloudMySite form you want to use.
- Select Connect to app form.
- Genie will look for forms inside your app.
- Choose the form you want visitors to use.
- Select Continue.
- Review the connection summary.
- Select Connect selected form.
When the connection succeeds, you should see a success message. The form may also show a badge such as Connected to app.
From that point forward, new submissions from that app form will be saved in CloudMySite Forms.
If Genie Finds More Than One App Form
Some apps have more than one form. For example:
- a Contact form
- a Newsletter signup form
- a Quote request form
- a Support form
When Genie shows multiple app forms, choose the one that matches the CloudMySite form you selected.
Example:
- Choose Contact Form for general messages.
- Choose Quote Request for pricing inquiries.
- Choose Newsletter Signup for email list interest.
If you are unsure, look at the page name, form name, or field names shown in the selection list.
If Genie Does Not Find a Form in Your App
If the connection window says No app forms detected, it means Genie did not find a visible form in the current app files.
You have two easy options:
- Select Generate connected contact form.
- Select Insert CloudMySite form block.
Either option lets Genie add a connected form block for you. After it is added, place it where visitors should use it, such as a Contact page, landing page, service page, or support page.
You can also ask Genie to add a form with a normal prompt before connecting it.
Prompt examples:
Add a contact page with fields for name, email, phone, subject, and message.
Add a quote request form to the Services page with name, email, project type, budget, and message.
Create a newsletter signup form with email and first name.
After Genie adds the form, return to Admin > Forms and connect it.
Step 4: Test the Form
Always test the form before relying on it.
- After connecting the form, select Test in preview if that option appears.
- Fill out the form with sample information.
- Submit the form.
- Return to Admin > Forms.
- Open the same form.
- Select Submissions.
- Confirm your test message appears.
- Check the recipient email inbox as well.
Use a test message that is easy to recognize, such as:
This is a test submission from the Genie app setup.
If the test appears in Submissions, the form connection is working.
Step 5: Publish Your App
After the test works:
- Review the page where the form appears.
- Make sure the form fields and button text look right.
- Publish the app.
- Open the live website.
- Submit one more test from the live page.
- Confirm the live test appears in Submissions.
Testing both preview and live pages helps confirm that visitors can reach you after publishing.
Understanding the Main Forms Admin Tabs
Inside Admin > Forms, each form may include several tabs.
Overview
Use Overview to quickly check form activity. It can show recent activity, connection status, and a summary of how the form is being used.
Submissions
Use Submissions to read messages that visitors sent through your app.
This is where you can:
- see new messages
- review contact details
- check what page or form the message came from
- confirm test submissions
- follow up with visitors
Settings
Use Settings to control how the form behaves.
Common settings include:
- form name
- recipient email
- redirect page after submission
- spam protection
- file uploads on supported plans
- Google Sheets integration on supported plans
- email template options
Code / API
The Code / API tab is mainly for advanced or manual setup. Most Genie users do not need it when using Connect to app form.
Email Template
Use Email Template when you want to change how notification emails look. Some plans may include AI-assisted email template generation.
Common Form Settings Explained
Recipient Email
This is the inbox that receives form notifications.
Examples:
If your team has multiple people, use a shared inbox when possible. That way, customer messages are not tied to only one person's email account.
Redirect URL
A redirect URL sends the visitor to another page after they submit the form.
Common examples:
- a thank-you page
- a booking instructions page
- a confirmation page
- a download page
If you do not set a redirect URL, the form may simply show a success message instead.
Spam Protection
Spam protection helps reduce unwanted automated submissions.
You may see options such as:
- Honeypot: a hidden field that helps catch bots.
- Turnstile: a visitor-friendly protection check.
- Other captcha options depending on your setup.
For most users, leaving spam protection on is recommended.
File Uploads
File uploads let visitors attach documents or images.
This is useful for:
- job applications
- resumes
- support screenshots
- project briefs
- signed documents
File uploads may require a supported plan.
Google Sheets
Google Sheets integration can send form submissions into a spreadsheet.
This is useful when you want to:
- track leads
- share responses with a team
- sort submissions
- maintain a backup outside email
Google Sheets may require additional setup and a supported plan.
Refresh a Form Connection
Use Refresh form connection when you changed form settings and want the connected app form to use the latest configuration.
Examples:
- You changed spam protection settings.
- You changed the form endpoint.
- You updated security settings.
- You reworked the form fields and want the connection refreshed.
After refreshing, test the form again.
Change Which App Form Is Connected
If you connected the wrong form:
- Open Admin > Forms.
- Choose the CloudMySite form.
- Select Change app form.
- Pick the correct form from your app.
- Confirm the connection.
- Submit a test message.
Changing the app form does not delete old submissions. It only changes where new submissions come from.
Disconnect a Form
Use Disconnect if you no longer want an app form to send submissions to a CloudMySite form.
After disconnecting:
- new submissions from that app form will no longer be sent to that CloudMySite form
- old submissions remain in the dashboard
- you can reconnect later if needed
Disconnecting is useful when a page is retired, a form is replaced, or you are reorganizing your app.
Best Practices
Keep Forms Short
Short forms usually get more responses. Ask only for what you need.
Good first contact form:
- name
- message
Good quote request form:
- name
- service needed
- budget range
- message
Use Clear Button Text
Use button text that matches the form purpose.
Examples:
- Send Message
- Request a Quote
- Book a Call
- Join the List
- Submit Application
Tell Visitors What Happens Next
Add a short sentence near the form so visitors know what to expect.
Examples:
- We usually reply within one business day.
- Tell us about your project and we will follow up with next steps.
- Submit your request and our team will review it shortly.
Test After Every Major Change
Test again whenever you:
- change the form fields
- change the recipient email
- turn spam protection on or off
- add file uploads
- publish a new version
- connect the form to a different page
Troubleshooting
I Do Not See Any Forms in Admin
Possible causes:
- You do not have an active Form plan yet.
- Your form has not been configured.
- You are signed in with a different CloudMySite account.
- The app is still loading form data.
Try this:
- Open the CloudMySite dashboard.
- Go to Forms.
- Confirm your plan is active.
- Confirm a form has been created.
- Return to your Genie app and reopen Admin > Forms.
I Do Not See the Form From My App
Possible causes:
- The current app page does not contain a form.
- The form was added as text or a visual section, not as a real input form.
- The form is inside an area Genie cannot automatically connect.
Try this:
- Ask Genie to add a real contact form.
- Reopen Admin > Forms.
- Select Connect to app form again.
- If no form is detected, use Generate connected contact form.
My Test Submission Does Not Appear
Check these items:
- Did you select Connect selected form?
- Did the connection show a success message?
- Did you submit from the connected form, not a different form?
- Did you open the correct CloudMySite form in Submissions?
- Did you publish the latest version if testing the live site?
- Did spam protection block the test?
Try submitting another short test message after confirming the connection.
I Am Not Receiving Email Notifications
Check these items:
- Open Settings and confirm the Recipient Email is correct.
- Check spam, promotions, or junk folders.
- Make sure your mailbox is not full.
- Confirm the submission appears in the dashboard.
If the submission appears in the dashboard but not email, the form is collecting messages correctly and the email setting should be reviewed.
The Wrong Form Is Receiving Messages
This usually means the wrong app form was selected during connection.
Fix it by using Change app form and selecting the correct form.
Visitors Say the Form Is Too Hard to Submit
Try making the form simpler:
- remove unnecessary fields
- make only the most important fields required
- use clear labels
- add helpful placeholder text
- keep spam protection visitor-friendly
Recommended First Setup
If you are setting up your first Genie app form, use this simple version:
- Create a CloudMySite form named Contact Form.
- Set the recipient email to your main business inbox.
- Ask Genie to create a Contact page if one does not exist.
- Connect the CloudMySite form to the Contact page form.
- Submit a preview test.
- Publish the app.
- Submit a live test.
- Check Submissions and your email inbox.
Once this works, you can add more advanced options such as redirect pages, file uploads, email templates, or Google Sheets.